
| 일 | 월 | 화 | 수 | 목 | 금 | 토 |
|---|---|---|---|---|---|---|
| 1 | ||||||
| 2 | 3 | 4 | 5 | 6 | 7 | 8 |
| 9 | 10 | 11 | 12 | 13 | 14 | 15 |
| 16 | 17 | 18 | 19 | 20 | 21 | 22 |
| 23 | 24 | 25 | 26 | 27 | 28 | 29 |
| 30 | 31 |
- 크롤링
- Ros
- 딥러닝
- ReactNative
- pandas
- expo
- 리액트네이티브
- 데이터분석
- 머신러닝
- 사이드프로젝트
- 조코딩
- App
- TeachagleMachine
- selenium
- JavaScript
- coding
- 강화학습 기초
- 카트폴
- python
- 강화학습
- 클론코딩
- 앱개발
- 전국국밥
- React
- redux
- Instagrame clone
- kaggle
- 정치인
- clone coding
- FirebaseV9
- Today
- Total
qcoding
[ReactNative Instagram clone #4_카메라 / 갤러리 사진 업로드 / Firebase Storage ] 본문
[ReactNative Instagram clone #4_카메라 / 갤러리 사진 업로드 / Firebase Storage ]
Qcoding 2022. 5. 11. 16:17* 이글에서는 카메라 / 갤러리에서 사진을 Firebase Storage에 업로드 한 후에 url 주소와 글내용을 FireStore에 다시 저장하는 과정을 정리하였다.
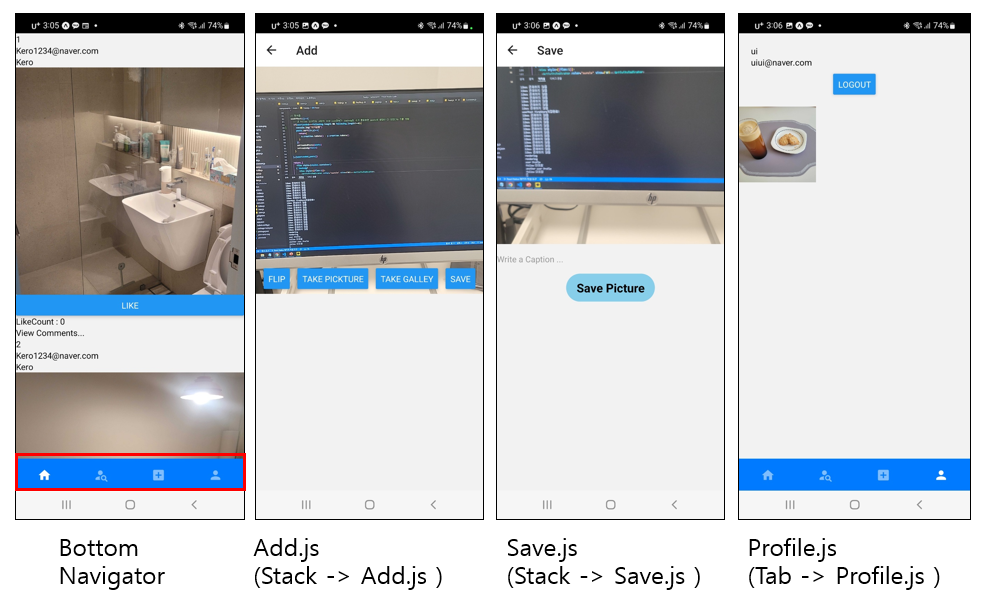
1) TabNavigator 내에서 업로드를 위한 Add.js (Stack Navigator로 이동하는 구조)
-> 로그인 후 Main.js 접속하면 TabNavigator에 의해서 Feed 화면이 보여진다. (위의 그림 1번), 여기서 사진업로드를 위해 BottomTab의 3번째을 클릭하면 Stack Navigator안에 있는 Add component로 이동하게 되어있다. 즉 TabNavigator 내에서 StackNavigator로 이동하게 되는 구조이다.
Main.js
->TabNavigator 내의 3번째 tab인 AddContainer를 클릭하면 아무것도 없는 EmptyScreen으로 이동하게 되고, listeners를 통해서 클릭을 감지하고, Stack Navigator내의 Add.js로 이동하게 된다.
const EmptyScreen=()=>{
    return null;
  }

return (
    <Tab.Navigator initialRouteName='Feed' labeled={false}>
      <Tab.Screen name="Feed" component={Feed}
       options={{
        tabBarLabel: 'Home',
        tabBarIcon: ({ color, size }) => (
          <MaterialCommunityIcons name="home" size={24} color={color} />
        ),
      }}/>
        <Tab.Screen name="Search" component={Search}
       options={{
        tabBarLabel: 'Search',
        tabBarIcon: ({ color, size }) => (
          <MaterialCommunityIcons name="account-search" size={24} color={color} />
        ),
      }}/>
        <Tab.Screen name="AddContainer" component={EmptyScreen}
          listeners={({ navigation, route }) => ({
            tabPress: (e) => {
              // console.log("Add tab press")
              // Prevent default action
              e.preventDefault();
              // Do something with the `navigation` object
              navigation.navigate('Add');
            },
          })}
          options={{
            tabBarLabel: 'Add',
            tabBarIcon: ({ color, size }) => (
              <MaterialCommunityIcons name="plus-box" size={24} color={color} />
            ),
          }}/>
        <Tab.Screen name="Profile" component={Profile}
          listeners={({ navigation, route }) => ({
                    tabPress: (e) => {
                      // console.log("Add tab press")
                      // Prevent default action
                      e.preventDefault();
                      // Do something with the `navigation` object
                      navigation.navigate('Profile',
                      {uid: getAuth().currentUser.uid});
                    },
                  })}
          options={{
            tabBarLabel: 'Profile',
            tabBarIcon: ({ color, size }) => (
              <MaterialCommunityIcons name="account" size={24} color={color} />
            ),
          }}/>
   </Tab.Navigator>
  )
}
App.js
-> 위에서 언급한대로 Add.js로 이동해서 카메라 혹은 갤러리에 접근하여 사진을 가져오게 되고 위의그림 2번째에서 save 버튼을 클릭하면 Save.js로 이동하여 실제로 사진이 저장하게된다. Save.js에서 사진이 저장된 후 다시 TabNavigator에 있는 Profile로 이동되어 최종적으로 위의그림 4번째 처럼 사진이 업로드 되게 된다.
  <Provider store={store}>
    <NavigationContainer>
        <Stack.Navigator initialRouteName="Main">
          <Stack.Screen name="Main" component={Main} options={{headerShown:false}}></Stack.Screen>
          <Stack.Screen name="Add" component={Add}></Stack.Screen>
          <Stack.Screen name="Save" component={Save}></Stack.Screen>
          <Stack.Screen name="Comment" component={Comment}></Stack.Screen>
        </Stack.Navigator>
    </NavigationContainer>
  </Provider>
2) 카메라 / 갤러리에서 가져온 사진 업로드 방법
* 우선 아래의 라이브러리를 설치하여 카메라 기능과 image-picker 기능을 사용할 수 있게한다.
expo install expo-camera
expo install expo-image-picker

--> firebase storage 규칙수정
rules_version = '2';
service firebase.storage {
  match /b/{bucket}/o {
    match /{allPaths=**} {
      allow read, write: if true;
    }
  }
}
강의를 보면서 동일하게 했지만 expo 버전문제로 image-picker에서 계속 에러가 발생하는 문제가 있었다. 에러의 내용은 처음 사진을 선택 후 다시 되돌아가면 발생했더 것으로 아래의 stackoverflow를 보고 해결하여 작성하였다.
parameter specified as non-null is null: 'method kotlin.o0.d.t.e'
I am trying to build an app where you can take images or import them from internal storage and perform some operations and display the image. I am using React Native for this. Everything works fine...
stackoverflow.com
이 과정은 크게 3단계로 분리 할 수 있다.
1) 카메라 / 갤러리에서 사진을 가져오는 단계
2) 가져온 사진을 save.js로 전달하여, Firebase Storage에 업로드 후 downloadUrl을 받아서 다시 FireStore에 post한 정보를 저장하는 단계
3) 저장 후 이동된 Profile화면에서 업로드 된 사진을 받아오는 단계
위와 같이 3단계로 정리할 수 있다.
2-1) 카메라 / 갤러리에서 사진을 가져오는 단계
Add.js
-> 내용을 살펴보면 requestCameraPermissionsAsync / requestCameraPermissionsAsync 함수를 통해서 카메라와 imagePicker 권한을 가져온다. 또한 camera에 접근하기 위해서 useRef를 사용하여 카메라에 접근할 수 있게한다.
카메라를 촬영할 때 위에서 말한 cameraRef에 있는 takePictureAsync를 사용하여 data.uri를 받아오고 , 갤러리에서 가져올 때에도 launchImageLibraryAsync에서 나오는 result.uri로 이미지 주소를 받는다. 받은 주소는 setImage()를 통해서 image라는 state에 저장되게 된다.
저장한 image state는 save 버튼 클릭시 onPess 이벤트를 통해서 navigation.navigate('Save',{image}) 로 Save.js로 이동과 동시에 params로 image 정보를 보내준다.
import React, { useState, useEffect,useRef } from 'react';
import { StyleSheet, Text, View, TouchableOpacity,Button,Image,Alert } from 'react-native';
import { Camera } from 'expo-camera';
import * as ImagePicker from 'expo-image-picker';

// 카메라를 클릭하는 것을 감지하기 위해 ref 사용?
// 카메라가 사진을 찍으면 ref 안에 값이 들어가게 되고
// 카메라가 찍은 사진의 uri 값을 알아와서 미리보기를 할 수 있게함.

export default function Add({navigation}) {
  const [camerahasPermission, setCameraHasPermission] = useState(null);
  const [galleyhasPermission, setGalleyHasPermission] = useState(null);
//   const [camera,setCamera]=useState(null);
  const [image,setImage]=useState(null);
  const [type, setType] = useState(Camera.Constants.Type.back);
//   아래이거는 image.picker가 오류나서 StackOverFlow 보고 수정함.
  const [isFocused,setIsFocused]=useState(true)

  // 카메라에 접근해서 사진촬영된 image를 불러오기 위해 takePictureAsync를 사용하려면
  // useRef로 접근해야함
  const cameraRef=useRef(null);

//  아래 코드는 카메라를 누르면 카메라를 찍은 것과 동시에 uri 값을 가져오게함
//  파일 저장은 자동으로 안되는 데 이게 기본 카메라 설정에 따라서 다른건지 api가 그런건지는 모르겠음
// 아래에서 cameraRef.currnet로 접근함
  const takePicture= async()=>{
      if(cameraRef){
        const data=await cameraRef.current.takePictureAsync(null)
        // console.log(data.uri)
        setImage(data.uri)
    }
  }

  const pickImage = async () => {
    setIsFocused(false);
    // No permissions request is necessary for launching the image library
    const result = await ImagePicker.launchImageLibraryAsync({
        mediaTypes: ImagePicker.MediaTypeOptions.All,
        allowsEditing: true,
        aspect: [4, 3],
        quality: 0.5,
      });
    // console.log(result);

    if (!result.cancelled) {
      setImage(result.uri);
      setIsFocused(true);
    }else{
      setIsFocused(true);
    }
  };

  useEffect(() => {
    (async () => {
      const cameraPermission = await Camera.requestCameraPermissionsAsync();
      setCameraHasPermission(cameraPermission.status === 'granted');

      const galleyPermission = await ImagePicker.requestCameraPermissionsAsync ();
      setGalleyHasPermission(galleyPermission.status === 'granted');
      setIsFocused(true)
    })();
  }, []);


  if (camerahasPermission === null || galleyhasPermission===null ) {
    return <View />;
  }
  if (camerahasPermission === false || galleyhasPermission===false) {
    return (
        <View style={{flex:1,justifyContent:"center",alignItems:"center"}}>
            <Text>No access to Camera or Galley</Text>
        </View>
    );
  }

 if (!isFocused){
    return null
  }


  if(isFocused){
    return (<>
        <View style={styles.container}>
            <View style={styles.cameraContainer}>
                <Camera
                  ref={cameraRef}
                  style={styles.fixedRatio}
                  type={type}
                  ratio={"1:1"}/>
            </View>
            <View style={styles.btnContainer}>
                <Button
                    title='Flip'
                    onPress={() => {
                        setType(
                        type === Camera.Constants.Type.back
                            ? Camera.Constants.Type.front
                            : Camera.Constants.Type.back
                        );
                    }}>
                </Button>
                <Button title='Take Pickture'
                        onPress={()=>{
                            takePicture();
                        }}>
                </Button>
                <Button title='Take Galley'
                        onPress={()=>{
                            pickImage();
                        }}>
                </Button>
                <Button title='Save'
                        onPress={()=>{
                            if(image){
                                navigation.navigate('Save',{image});
                            }
                            else{
                                Alert.alert("사진을 선택해주세요")
                            }
                        }}>
                </Button>
            </View>
            <View style={{flex:1}}>
                {image && <Image style={StyleSheet.absoluteFill} source={{uri:image}}></Image>}
            </View>
    </View>
      </>);
  }
}

const styles = StyleSheet.create({
    container:{
        flex:1,
        justifyContent:"center",
    },
    cameraContainer:{
        flex:1,
        flexDirection:'row'
    },
    fixedRatio:{
        // flex:1,
        width:"100%",
        aspectRatio:1
    },
    btnContainer:{
        width:"100%",
        flexDirection:'row',
        justifyContent:"space-evenly",
        alignItems:"flex-end",
        paddingVertical:15
    }
  });
2-2) 가져온 사진을 save.js로 전달하여, Firebase Storage에 업로드 후 downloadUrl을 받아서 다시 FireStore에 post한 정보를 저장하는 단계
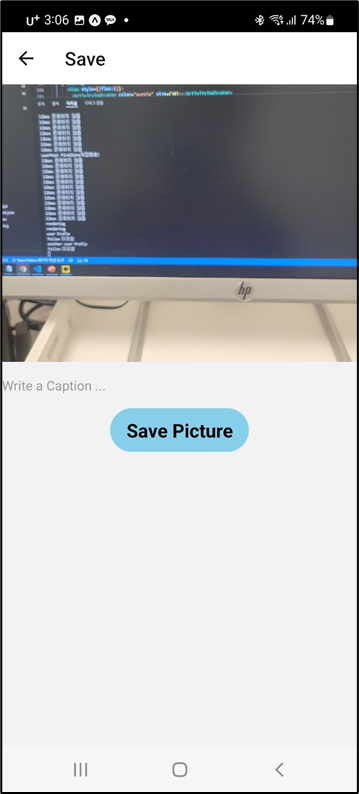
Save.js
-> FireStoage upload
앞에서 params로 보낸 image 정보를 hook을 통해 const {params:{image:image_uri}} = useRoute(); , image_uri로 받아온다. 그런다음 사용자가 내용을 입력한 후에 SavePicture 버튼을 누르면 uploadImage() 함수가 동작하게 되는데, 여기서는 image 형태를 blob의 형태로 변경하여 저장한다. 해당내용은 firebase 문서를 확인하면 자세히 알수있다.
uploadImage() 함수에서 파일이 fireStorage에 업로드 되는 snapshot.state를 받고 현재 몇 %가 진행되었는 지 확인 할 수 있다. 업로드가 다 되면 getDownloadURL 함수에 downloadURL이름으로 Storage에 업로드 된 url를 받게된다.
-> FireStore upload
위에서 받는 downloadURL과 uid 정보로 saveFireStore() 함수가 실행된다. 여기서 실제로 FireStore에 post정보가 저장되게 된다. posts collection -> uid 문서를 만들고 그 안에 addDoc() 함수를 통해서
{
downloadURL, caption, creation: serverTimestamp(), userName:user.name, email:user.email, likeCount:0
}
의 형태로 저장한다. 저장이 완료되면
navigation.replace("Main",{screen:"Profile",params:{uid:undefined}}) 를 통해서 Main.js의 TabNavigator 내의 Profile.js로 이동시켜 주며, 이 때 params로 uid:undefiend로 보내준다. 이는 3단계에서 Profile.js가 렌더링 시 useEffect를 통해서 userPosts를 redux를 통해서 다시 받아오기 위하여 사용한다.
import React,{useState} from 'react'
import { View, Text, TextInput,Image,Button,StyleSheet,ActivityIndicator,TouchableOpacity} from 'react-native'
import { useRoute } from '@react-navigation/native';
import { getFirestore,collection,doc,addDoc,serverTimestamp ,getDoc } from 'firebase/firestore';
import { getStorage,ref, uploadBytesResumable,getDownloadURL} from "firebase/storage";
import { getAuth } from "firebase/auth";

const Save = ({navigation}) => {

 const {params:{image:image_uri}} = useRoute();
 const [caption,setCaption]=useState("");
 const [saving,setSaving]=useState(false)


 const saveFireStore=async(uid,downloadURL)=>{
    // FireStorage에 업로드 후 FireStore에 저장
    // 구조는 posts/uid/userPosts/{downloadURL,caption.creation}의 형태로 저장함.
    const db = await getFirestore();
    // posts 내에 user의 email / name을 저장하기 위함
    const docUserRef =  doc(db, "users",uid);
    const docUserSnap = await getDoc(docUserRef);
    let user
    if (docUserSnap.exists()) {
      user=docUserSnap.data()
      console.log("save 시 ",user)
    } else {
      console.log("user정보가 존재하지 않음")
    }
    // setDoc 와 add 둘다 저장하는 코드인데, setDoc는 id를 설정하고 add는 자동으로 id생성함
    // 2중 구조에서 저장하기 방법. 아래는 위의 posts (collection) . doc(uid) . userPosts (collection) . doc(랜덤)
    // 의 구조안에 저장하는 형태
    const docPostsRef = await doc(db, "posts", uid);
    const postRef = await addDoc(collection(docPostsRef, "userPosts"), {
        downloadURL,
        caption,
        creation:serverTimestamp(),
        userName:user.name,
        email:user.email,
        likeCount:0
      }).then(()=>{
          console.log("userPost FireStore저장완료!")

          // save 후에 사용자의 post가 업데이트 되기 위해서 Main --> Profile로 보내는데
          // 이 때 useEffect는 paramsUid가 변경되어야만 실행된다.
          // 일부러 undefined를 보내주고 undefiend일때 에도 실행되게 한다.
        navigation.replace("Main",{screen:"Profile",params:{uid:undefined}})

      }).catch((err)=>{ console.log("FiresotreErr",err)}).finally(()=>{
        setSaving(false)

      });
 }

 const uploadImage= async ()=>{
    setSaving(true)
    const response=await fetch(image_uri);
    const blob=await response.blob();
    // uid 불러옴
    const auth = await getAuth();
    const {uid} = auth.currentUser;
    const imagePath=`post/${uid}/${Math.random().toString(36)}/`
    // firebase storage v9
    // 아래와 같은 형태로 이미지 저장
    // /images/currnet_user_uid/image_uri
    console.log("image_path",imagePath)
    const storage =await getStorage();
    const storageRef =await ref(storage, imagePath);
    // 'file' comes from the Blob or File API
    const uploadTask = uploadBytesResumable(storageRef, blob);

    // Register three observers:
    // 1. 'state_changed' observer, called any time the state changes
    // 2. Error observer, called on failure
    // 3. Completion observer, called on successful completion
    uploadTask.on('state_changed',(snapshot) => {
        // Observe state change events such as progress, pause, and resume
        // Get task progress, including the number of bytes uploaded and the total number of bytes to be uploaded
        const progress = (snapshot.bytesTransferred / snapshot.totalBytes) * 100;
        console.log('Upload is ' + progress + '% done');
        switch (snapshot.state) {
          case 'paused':
            console.log('Upload is paused');
            break;
          case 'running':
            console.log('Upload is running');
            break;
        }
      },
      (error) => {
        // Handle unsuccessful uploads
        console.log("error 발생!!",error)
      },
      () => {
        // Handle successful uploads on complete
        // For instance, get the download URL: https://firebasestorage.googleapis.com/...
        getDownloadURL(uploadTask.snapshot.ref).then((downloadURL) => {
          console.log('File available at', downloadURL);
          saveFireStore(uid,downloadURL);
        });
      }
    );
 }

  return (
    <View style={{flex:1,position:"relative",alignItems:"center"}}>
      {saving&&<View style={{width:"100%",height:"100%",position:"absolute",zIndex:99,alignSelf:"center",justifyContent:"center"}}>
            <ActivityIndicator color="purple" size={70}></ActivityIndicator>
          </View>}
      <View style={{width:"100%",height:300}}>
        <Image style={StyleSheet.absoluteFill} source={{uri:image_uri}}></Image>
      </View>
      <TextInput
        style={{width:"100%",height:50}}
        placeholder='Write a Caption ... '
        onChangeText={(txt)=>{
            setCaption(txt)
        }}
      ></TextInput>
      <TouchableOpacity
        style={{borderRadius:50,width:150,backgroundColor:"skyblue",paddingVertical:10,paddingHorizontal:10}}
        // 여러번 클릭하는 것 방지하기 위해 saving 중이면 null 반환
        onPress={()=>{
          if(!saving){
            uploadImage();
          }
          console.log("저장중! 클릭방지!")
      }}>
          <Text style={{textAlign:"center",fontSize:20,color:"black",fontWeight:"bold"}}>Save Picture</Text>
      </TouchableOpacity>
    </View>
  )
}

export default Save
2-2) 가져온 사진을 save.js로 전달하여, Firebase Storage에 업로드 후 downloadUrl을 받아서 다시 FireStore에 post한 정보를 저장하는 단계
Profile.js
-> 여기서는 Profile.js로 이동 시 앞에서 FireStore에 저장된 정보를 받아오는 단계로, 정보를 받아올 때에는 redux의 action을 사용하여 받아온 정보를 state로 관리한다.
-> useEffect에서 paramsUid==await getAuth().currentUser.uid ||paramsUid==undefined 를 통해서 profile.js가 실행될 때의 조건을 구분한다. 확장성 있게 사용하기 위해 profile.js에 접속할 수 있는 방법들을 생각해 보면
1) 내 자신이 profile.js 를 확인할 때 --> 즉, parmaUid == await getAuth.cuurnetUser.uid 가 되는경우
2) 내가 다른사람의 profile.js를 확인할 때 --> 즉, parmaUid != await getAuth.cuurnetUser.uid 가 되는경우
3) save 후에 profile.js 이동할 때 --> paramsUid==undefined 경우이다.
위의 3가지 경우 모두 profile로 접속하여 새롭게 추가된 정보가 있다면 rendering을 다시 해야함으로 useEffect에 두번째 인자로 paramsId가 변경될 때마다 실행되게 한다. useDispatch hook을 통해 redux에 action creator 생성하게 되고 이때 fetchUserPosts / fetchUsers 을 통해서 업로드된 posts를 가져오거나, 다른 사람의 profile을 볼 때 currentUser를 변경하여 다른 Profile을 렌더링한다.
import React,{useEffect,useState} from 'react'
import {StyleSheet,View, Text,Image,FlatList,Button,ActivityIndicator} from 'react-native'
import { useSelector,useDispatch} from 'react-redux'
import { fetchUserPosts,fetchUsers} from '../../redux/actions';
import { getAuth } from "firebase/auth";
import { getFirestore,collection,doc,setDoc,deleteDoc,addDoc} from 'firebase/firestore';


// 여기서 들어오는 paramsUid는 2가지의 경우로 들어온다.
// 1) user가 profile tab을 클릭시 본인의 uid를 getAuth부터 받아서 들어감
// 2) 다른 사람들의 id검색을 위해 Search 컴포넌트에서 검색을 통해 가져온 user의 uid
const Profile = ({route:{params:{uid:paramsUid}}}) => {

  const dispatch = useDispatch();

  const [loaindg,setLoaindg]=useState(true);
  // folling system
  const [following,setFollowing]=useState(false);
  const [currentUser,setCurrentUser]=useState(false);

  const SelectedUser= useSelector(state => state.userState.currentUser);
  const posts= useSelector(state => state.userState.posts);


  // userEffect에서 rednder을 변경하기 위해 paramsUid변경시
  // 새로운 user의 profile이 렌더링 되야 함으로, 배열에 넣어줌
  useEffect(async()=>{
    // following 정보받아옴
    // 기존의 fechUserPosts를 사용하기 위해서 함수를 변경해줌
    // 계정 당사자가 proflie 클릭하는 경우
    // 위에서의 1번의 경우
    // save 한 후에 pramsUid를 일부로 undefined로 보내주어서 다시 렌더링 하게 함
    if(paramsUid==await getAuth().currentUser.uid ||paramsUid==undefined){
      // user가 올린 posts를 받아옴
      console.log("user Profle")
      dispatch(fetchUserPosts());
      dispatch(fetchUsers());
      setCurrentUser(true)
      setLoaindg(false)


    }
    // 다른 user의 post를 가져옴
    // 위에서의 2번의 경우
    else{
      console.log("another user Profle")
      dispatch(fetchUserPosts(paramsUid));
      dispatch(fetchUsers(paramsUid));
      setCurrentUser(false)
      setLoaindg(false)
    }

  // following 인지 확인
  // followingMember값을 state에서 받아오며 변화가 되면 다시 unFollw/Follow 정보를 받아오기위하여
  // lenth가 변경되면 다시 실행되게함.
  if (followingMember.indexOf(paramsUid)>-1 ){
    console.log("follow 포함")
    setFollowing(true)
  }else{
    console.log("follow 미포함")
    setFollowing(false)
  }
  },[paramsUid])

  return (
    <View style={styles.container}>
      <View style={styles.containerInfo}>
        <Text>{SelectedUser.name}</Text>
        <Text>{SelectedUser.email}</Text>
        <View style={styles.btnContainer}>
          {/* cuurnetUser값이 false이면 현재 Login ID 사용자 이므로
          Follow /UnFollow 버튼을 보여주어야한다.
          */}
          {!currentUser?
          // follow 여부에 따라서 FireStor에서 저장하고 삭제하고, 함수를 다르게 사용함.
          <View>
            {following?
              <Button Button title='Unfollow' onPress={()=>{deleteFireStoreFollow()}}></Button>:
              <Button title='Follow' onPress={()=>{saveFireStoreFollow()}}></Button>
            }
          </View>  :null
        }
            <Button
            title='LogOut'
            style={styles.btn}
            onPress={async()=>{
          await getAuth().signOut()
          }}></Button>
      </View>
      </View>
      { loaindg?
        <View style={{flex:1}}>
          <ActivityIndicator color="purple" size={30}></ActivityIndicator>
        </View>:
      <View style={styles.containerGallery}>
        <FlatList
          numColumns={3}
          horizontal={false}
          data={posts}
          keyExtractor={(item)=>item.downloadURL+""}
          renderItem={({item})=>{
            return(
              <View style={styles.containerImage}>
                <Image
                  style={styles.image}
                  source={{uri:item.downloadURL}}
                >
                </Image>
              </View>
            )
          }}
        ></FlatList>
      </View>}
  </View>
  )
}
actions/index.js (=action creator)
-> fetchUsers 는 currnetUser를 변경하여 지금 클릭한 유저의 Profile을 정보를 state로 관리한다.
-> fetchUserPosts는 업로드한 post의 정보를 새롭게 받아오기 위해서 사용한다.
// paramsUid는 다른 사람의 id를 클릭해서 profile로 연결할 때 생기는 값
export const fetchUsers=(paramsUid)=>{
    return(
        async(dispatch)=>{
            // user정보
            const auth = await getAuth();
            const {uid} = auth.currentUser;
            // console.log("userID는",uid)
            // FireStore DB
            const db = await getFirestore();
            // data 가져오기(db,collection이름,docID)
            const docRef = doc(db, "users", paramsUid?paramsUid:uid);
            const docSnap = await getDoc(docRef);
            if (docSnap.exists()) {
                // console.log("user정보가 있음")
                // dispatch ( action생성함수 ) 이 들어간다.
                // action생성함수는 actions/index.js에 정의되어 있고
                // 실제 action에 대한 수행은 reducers/user
                dispatch({type: USER_STATE_CHANGE,currentUser:docSnap.data()})
            } else {
            // doc.data() will be undefined in this case
            console.log("user정보가 존재하지 않음")
            }
        }
    )
}


export const fetchUserPosts=(paramsUid)=>{
    return(
        async(dispatch)=>{
            // user정보
            const auth = await getAuth();
            const {uid} = auth.currentUser;
            // FireStore DB
            const db = await getFirestore();
            // 2중으로 중첩된 collection에서 data 가져오기(db,collection이름,docID,subCollection)
            // 정렬포함
            const docRef = await collection(db, "posts", paramsUid?paramsUid:uid,"userPosts");
            const q = await query(docRef, orderBy("creation", "asc"));
            const querySnapshot = await getDocs(q);
            // 여기서 querySanpshot에서 한개씩 가져오면 저장되어있는 object이다.
            // posts = [{},{},{}] 의 형태로 userPosts 아래 값들을 넣는다.
            const posts = querySnapshot.docs.map(doc => ({
                ...doc.data()
              }));
              dispatch({type: USER_POSTS_STATE_CHANGE,posts:posts})
        }
    )
}
constant/index.js (=action )
export const USER_STATE_CHANGE='USER_STATE_CHANGE'
export const USER_POSTS_STATE_CHANGE='USER_POSTS_STATE_CHANGE'
reducers/user.js (=reducer )
-> 실제 action을 받아서 수행하고 currnetUser 와 posts로 각각 정보를 관리한다.
import {USER_STATE_CHANGE,USER_POSTS_STATE_CHANGE,USER_FOLLOWING_STATE_CHANGE,CLEAR_DATA} from "../constant"

const initialState={
    currentUser:null,
    posts:[],
}

export const user =(state=initialState,action)=>{
    switch(action.type){
        case USER_STATE_CHANGE:
            return {
                ...state,
                currentUser: action.currentUser
            }
        case USER_POSTS_STATE_CHANGE:
            return {
                ...state,
                posts: action.posts
            }
        case CLEAR_DATA:
            return initialState
        default:
            return state;
        }
}
Profile.js
-> useSelector hook을 통해서 redux에서 state를 각각 가져와서 사용한다.
  const SelectedUser= useSelector(state => state.userState.currentUser);
const posts= useSelector(state => state.userState.posts);'ReactNative' 카테고리의 다른 글
| [ReactNative Instagram clone #3_로그인 및 Auth , Redux user 상태관리 (0) | 2022.05.11 |
|---|---|
| [ReactNative Instagram clone #2_파일구조 및 DB 구조 (0) | 2022.05.11 |
| [ReactNative Instagram clone #1_소개 ( redux / FireBase] (0) | 2022.05.11 |
| [React Navigation]Drawer Navigator 설치 및 적용 *Realm 과 에러 (0) | 2022.01.26 |
| [React_Native_study_16]useAsset 사용법 (0) | 2021.12.30 |


